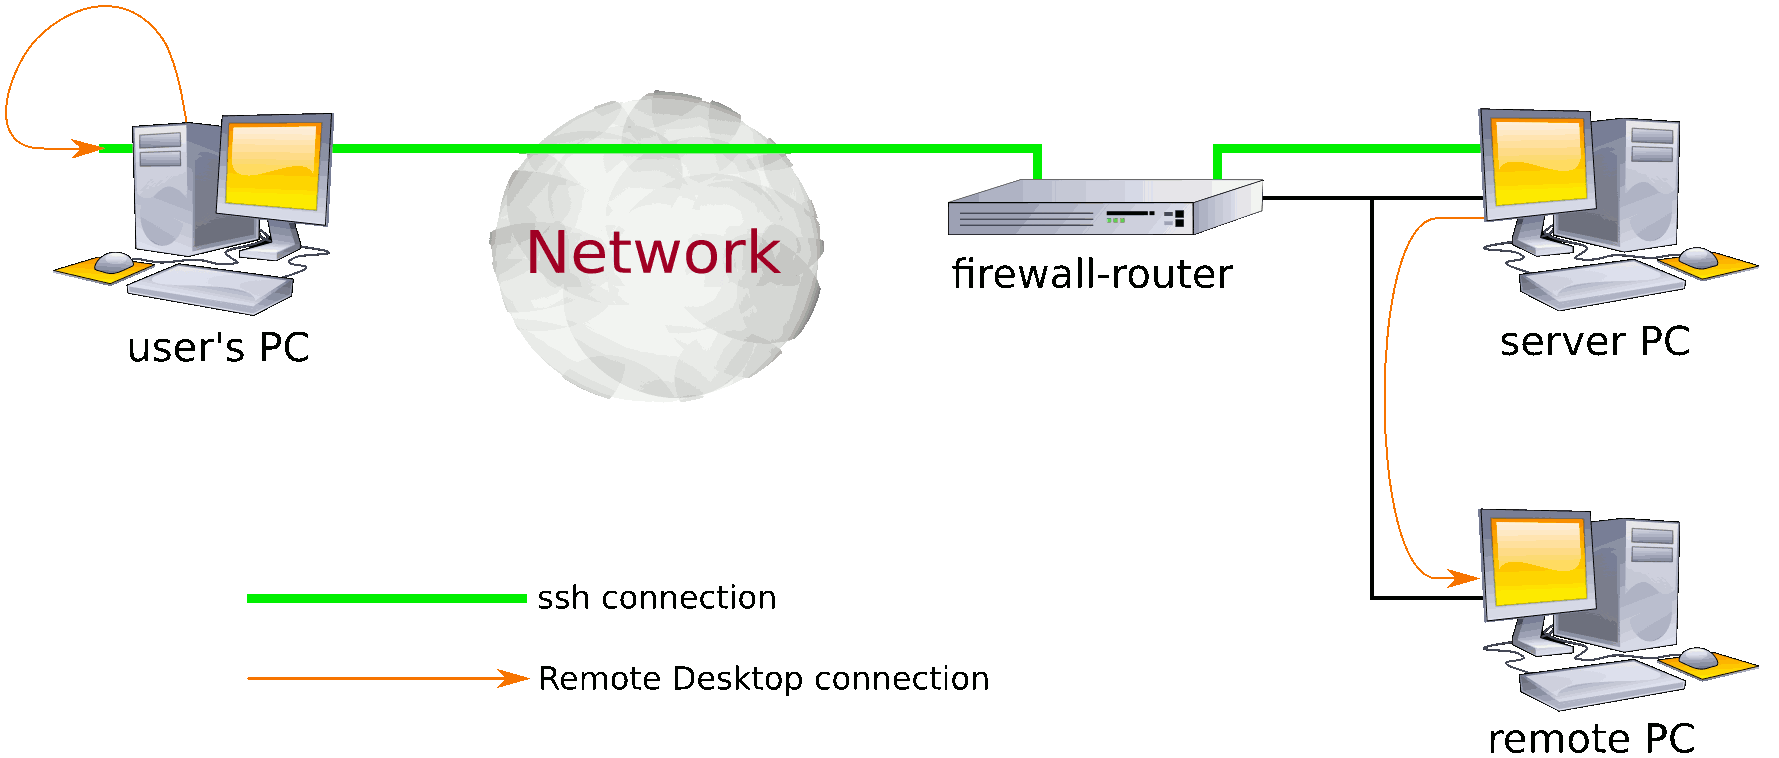
Internal server
In this configuration the user starts an encrypted link to a server located in the same network as the computer to be accessed remotely, passing through a firewall-router. The encrypted link carries a remote desktop session from the user's computer which is passed to the remote computer by the server.
There is more complexity in setting up the remote end than when using an external server – the most difficult parts are in ensuring the various computers are able to communicate with each other.
See the introductory notes for an overview.
To maintain the security of the remote system yet provide a measure of convenience to the user it is suggested that the logging in to the remote server should always require a username and password, but logging in to the remote computer can be automated.
Remote computer
The computer to be accessed remotely must support Microsoft's Remote Desktop Services software, formerly called Terminal Services. The Professional versions of Windows XP and Windows 7 include this but it is not included in Windows XP Home edition.
The following instructions are for Windows XP Professional but equivalent actions are required in other versions of Windows that support Remote Desktop Services.
From the Start menu select Settings » Control Panel
- In User Accounts make sure that there is an account with both a login name and a password. A password enabled account is required by the Remote Desktop Services software.
- Open the System window. In the Remote tab, make sure the tick-box in the Remote Desktop section (lower part) is enabled. Use the Select Remote Users… button to grant access to the user selected in #1.
- Open Network Connections and
then open whichever connection is used by the computer to access
the internal network. Highlight the Internet Protocol
(TCP/IP) driver and select the Properties button. If
an IP address is specified make a note of it; the alternative is
that the computer will Obtain an IP address automatically.
- If the IP address is obtained automatically it
is important to know the address currently being used. From
the Start menu select Run… and in the
drop-down box type
cmdthen select the OK button to open a command window. In the command window typeipconfig– this will show the IP address of this computer, and it should be noted for later. - The address of this computer is used by the server computer so that it can pass on the incoming Remote Desktop connection when it arrives.
- If the IP address is obtained automatically it
is important to know the address currently being used. From
the Start menu select Run… and in the
drop-down box type
If firewall software is running make sure that an exception is provided to allow Remote Desktop connections to be made to this computer. If the built-in firewall is being used, an exception should have been added automatically when the Remote Desktop Services were enabled.
Server computer
The server computer, which forwards incoming remote desktop connections, can be running any version of Microsoft's Windows operating system from Windows 2000 onwards. Like the computers to be accessed remotely, the IP address of the server must be noted – see #3 above.
To handle incoming ssh connections the most recent version of copssh is installed. This is free to download and free to use software that implements a server for ssh connections. It is available from the ITeF!x website.
During installation a new sub-menu is added to the Start menu, at Programs » Copssh, with options to activate and deactivate users. Only users with existing logins on the server can be activated, so from the Start menu select Settings » Control Panel then open User Accounts to create new accounts, and make sure each one is protected by a good password.
Good passwords are very important and especially so in this case. They are the only safeguard against miscreants gaining access to your computer systems, so should be of reasonable length and hard to guess. They should also be relatively easy to remember, since remote users will need to enter a password whenever they want to access computers at the remote site.
A user account should be set up for each person requiring remote access, each user account should have its own unique password, and passwords shouldn't be shared between users.
Once the user accounts have been created, go to the Copssh program menu and activate the desired users.
Note: remote users will not be able to login to the desktop of the server computer.
If firewall software is running on the server check that an exception has been added to allow ssh connections to be received on port 22. This may have been done automatically when Copssh was installed but it is wise to make sure.
Internal network
The first requirement is for computers that will receive Remote Desktop connections and the server to have fixed addresses. This can be arranged either by them being assigned static addresses or by using dynamic addresses but with the addresses tied to specific computers.
If the internal network uses addresses assigned by a firewall-router (dynamic addresses) then often it can be arranged that specified computers are always assigned the same address. This is carried out by linking the Media Access Control (MAC) address to a fixed IP address. Sometimes this is called as static DHCP (static Dynamic Host Configuration Protocol) in the firewall-router's control interface.
The second requirement is that the firewall-router is set to pass incoming ssh connections to the server so that they can be handled by the copssh software. To set this up the server's IP address, noted previously, is used.
By default ssh connections are received on port 22 but it is worth considering relaying a non-standard port on the firewall-router's external interface to the server since this will reduce the number of nefarious access attempts.
Internet connection
As with the internal addresses, the external address of the router may be static or dynamically assigned. If it is the latter then when the router is restarted it may be given a different address by the Internet Service Provider, (ISP). This is a problem when users elsewhere want to connect to computers at the same site as the router.
One solution is to use a cheap or free Dynamic DNS service in which a DNS name is automatically mapped to the IP address assigned by the ISP. A list of providers is available. For many of these, keeping the name to address mapping up to date is handled by a program running on one of the computers behind the router. Alternatively, the router may include support for some of these services.
User's computer
There are three parts to configuring the Remote Desktop connections at the user end. The first is to create an encrypted ssh connection to the remote server, and the free to download and free to use PuTTY software, described at Wikipedia, handles this. The second is to configure the Remote Desktop Connection software so that it connects via PuTTY, and the final part is to arrange for tailored PuTTY and Remote Desktop connections to be included in the Start menu.
PuTTY
PuTTY is a terminal emulator that supports a range of connection types including the ssh protocol. It also allows an ssh connection to be used by other programs – in this case it will be used to forward connections received on a local port to the remote server. If the standard distribution has been installed, (rather than just the PuTTY program), it will be in the Start menu at Programs » PuTTY » PuTTY.
PuTTY starts by opening a connection window and it is here that all the configuration takes place. The following settings must be changed from the default values:
- In the Session category fill in the Host Name with
the.remote.site
where 'the.remote.site' is replaced by the internet name of the remote site.- If a non-standard port was used on the external interface of the firewall-router for incoming ssh connections, change the Port setting to match.
- In the Window category, select the Behaviour
sub-category and enter an appropriate Window title. An example
might be:
Encrypted link - In the Connection category enable TCP keepalives.
- In the Connection category, select the Data sub-category and set the Auto-login username to whichever user account is being used to login to the server computer at the remote site.
- In the Connection category, select the SSH sub-category, enable compression and set the preferred protocol version to "2 only".
- Expand the SSH sub-category and under
Tunnels add a new forwarded port, (a tunnel), for each
computer to be accessed at the remote site. The
Source port should contain something like:
127.0.0.2:4050
The part before the colon is the address and 127.0.0.2 is one of a series of addresses that identify the local computer – this value should be used for all tunnels.- The part after the colon is the port number and this should be unique to each tunnel as it is used to select the computer to be accessed at the remote site, that is, each tunnel starts from the specified port number on this computer.
- The Destination should contain the
address of the particular computer to be accessed at the remote
site, followed by a colon then the port number 3389. This is
where the address noted in #3 of the
Remote Computer section is used. An
example might be:
192.168.1.112:3389
Port 3389 is where the Remote Desktop Services software waits for new Remote Desktop connections. - Once the Source port and Destination boxes have been filled in, select the Add button.
- Finally return to the Session category and save the modified configuration by entering a suitable name in the Saved Sessions box and selecting the Save button.
Remote Desktop client
Before configuring a Remote Desktop Connection it is convenient to
edit the hosts file so that the title bar of the Remote
Desktop Connection can have a meaningful name. It might be necessary
to search for the file but on Windows XP Professional it is located
under C:\WINDOWS\system32 in the
drivers\etc directory. Despite not having a file
extension it can be edited using Notepad. Add a new line, in the
format described in the file, starting with 127.0.0.2 then followed
by a spaces or tab characters then the chosen name. Examples are:
127.0.0.2 AccountsPC
127.0.0.2 acc.company.ssh
127.0.0.2 payroll.secure
but remember there should be no characters or spaces before the
number on the line. A further restriction is that the name must be
one word, that is it must not contain any spaces or tab characters,
nor any punctuation other than a hyphen or a period. Add one entry
in this format for every computer that is to be accessed at the
remote site, keeping the numbers the same for each entry.
As mentioned in the introductory notes the Remote Desktop Connection software is invoked from the Start menu at Programs » Accessories » Remote Desktop Connection. In similar fashion to PuTTY, Remote Desktop Connection opens a window where all the configuration takes place. To access the configuration options, select the Options button. There are only a small number of changes needed:
- On the General tab, Logon settings area, in
the Computer box enter the name added to the
hosts file followed by a colon then the port number
entered in the Source port of the
PuTTY configuration for the selected
remote computer. Using an entry from the example hosts file,
above, this could be:
AccountsPC:4050
Remember, the port number determines which computer at the remote site will be accessed rather than the name. - In the same area enter the User name for logging into that PC, and enable the Allow me to save credentials tick-box.
- On the Display tab, in the Remote desktop size area, adjust the size to be no larger than the pixel resolution of the display on the local computer. The same size is a good choice since when the remote desktop window is maximised it takes up all of the local display.
- On the Local Resources tab it might be better to set the Remote computer sound to Leave at remote computer as this improves performance.
- In the Experience tab deselect the Themes tick-box, also for improved performance.
- Return to the General tab and select the Save As button, giving the saved configuration file a meaningful name.
The configuration is saved in an .rdp file under My
Documents, and will be used in the next section.
Start menu
An entry can be added to the Start menu to start PuTTY with
the saved session. First copy the PuTTY shortcut to a convenient
location in the menu hierarchy then open the context menu to edit
the Properties. In the General tab change the name
to reflect the purpose of the menu entry – Encrypted link
to Remote Site might be suitable – then go to the
Shortcut tab and append the following in the Target
box:
-load SessionName
If the actual session name includes spaces then it will need to be
enclosed in quotes. A couple of examples show the difference:
-load RemoteSite
-load "Remote Site"
Select the OK button to complete this step. The ssh
connection can be tested by selecting the newly created menu entry;
a command window box should appear on the screen with a prompt for
the user to enter the correct password. When a password has been
accepted the connection is fully established. The connection is
closed by closing the window.
An entry can also be added to the Start menu to start a
Remote Desktop connection by making a short-cut link to the
appropriate .rdp file saved at the end of the process
described in the Remote Desktop client
section, and moving it to the same location in the menu hierarchy
as the Encrypted Link to Remote Site shortcut. It should
be renamed so that it is meaningful; an example might be
Remote Site Accounts PC.
User guide
The first step is to start the ssh connection to the server at the remote site by, using the example above, selecting Encrypted link to Remote Site from the Start menu. When the server is connected a password prompt is displayed. After the password has been accepted the link is available to tunnel Remote Desktop connections.
It may be helpful to contact someone at the remote site before initiating a Remote Desktop connection to a specific computer in case it is already being used.
Remote Desktop connections can be established by selecting the appropriate link from the Start menu. More than one Remote Desktop connection may be in use at the same time. The first time a connection is used the password will be saved and it will not need to be entered on subsequent occasions.
It may also be helpful to make sure that staff at the remote site know when a computer is free for others to use.
Once all the Remote Desktop connections have been closed it is safe to close the PuTTY window, severing the encrypted connection with the server.