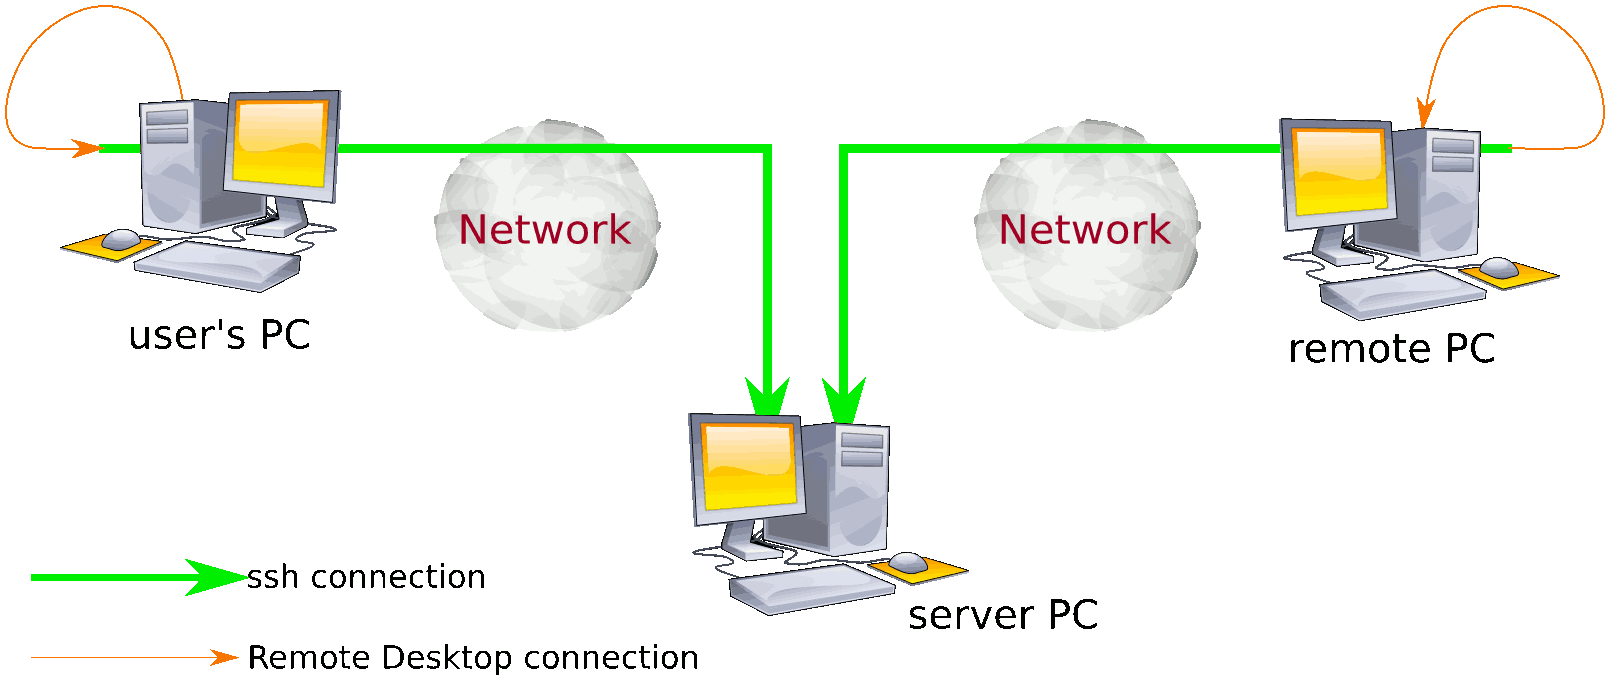
External server
In this configuration an encrypted link is started from the remote computer, either manually or automatically, to a server located elsewhere. The user starts an encrypted link to the same server, which is shown in the diagram as being located away from the user but could equally be in the same network as the user's computer.
When both links are in place, a remote desktop session passes over the secure link from the user's computer to the server, where it is forwarded over the other secure link to the remote computer.
This results in less complexity at the remote end than when an internal server is used – the only changes are to the remote computer – but there is more complexity at the intermediate server.
See the introductory notes for an overview.
To maintain the security of the remote system yet provide a measure of convenience to the user it is suggested that while logging in to the intermediate server can be automated[1], logging in to the remote computer should always require a username and password.
Remote computer
The computer to be accessed remotely must support Microsoft's Remote Desktop Services software, formerly called Terminal Services. The Professional versions of Windows XP and Windows 7 include this but it is not part of Windows XP Home edition.
The following instructions are for Windows XP Professional but similar actions are required in other versions of Windows that support Remote Desktop Services.
From the Start menu select Settings » Control Panel
- In User Accounts make sure that there is an account with both a login name and a password. A password enabled account is required by the Remote Desktop Services software.
- Open the System window. In the Remote tab, make sure the tick-box in the Remote Desktop section (lower part) is enabled. Use the Select Remote Users… button to grant access to the user selected in #1.
If firewall software is running make sure that an exception is provided to allow Remote Desktop connections to be made to this computer. If the built-in firewall is being used, an exception should have been added automatically when the Remote Desktop Services were enabled.
SSH clients
The encrypted link from the remote computer to the intermediate server can use either copssh or Cygwin ssh. Both are free to download and free to use; indeed, copssh is a convenient repackaging of cygwin components with some extra Windows utilities. It is useful to know that PuTTY, which is used for the user's computer, does not work in the configuration needed for the remote computer.
Copssh, available from the ITeF!x website, is the simpler option - it is a very much smaller package that is easy to download and install. For the purpose of connecting to the intermediate server the ssh client program is used.
The alternative is Cygwin. Once
the installer program has been downloaded it can be run to install a
base system and optional packages – select ssh and
autossh from the Net program group.
If Cygwin is chosen then Autossh can be used to provide a persistent[2] link; if the remote computer is rebooted the link can be re-established automatically.
Basic configuration
Whichever ssh client is chosen, the simplest way to invoke it is by
using a shortcut link to either
C:\Program Files\ICW\Bin\ssh.exe or
C:\cygwin\bin\ssh.exe, as appropriate, and adding command
line
parameters
to the shortcut. Start by selecting the shortcut, opening the context
menu and selecting Properties.
- Append the following to the Target box:
-2 -C -N -R xxxx:localhost:3389 -p yyyy user@server
where each of the options have the following meanings:
-2… only use the V2 protocol
-C… enable compression
-N… do not start a command interface on the intermediate server
-R xxxx:localhost:3389
-P yyyy
- The '-R' option is used to specify which port at the intermediate server should be connected to the Remote Desktop Services port on this computer – replace 'xxxx' with the port allocated for this purpose, which must be greater than 1024.
- The '-P' option is only needed if the intermediate server uses a non-standard port for incoming ssh connections, in which case replace 'yyyy' with the correct port number. If the standard port (22) is used then this option should be removed.
- Replace 'user' with the correct name for logging on at the intermediate server, and replace 'server' with the name of the intermediate server.
- Add a suitable description to the Comment box. An example
might be:
Create SSH reverse tunnel for RDP connection - Optionally choose an appropriate icon by selecting the Change Icon… button; a yellow Locked icon might be suitable.
- Change the shortcut name to something meaningful. An
example might be:
Encrypted link to server
At this point, when the shortcut is invoked a window will appear requesting a password. When the password has been accepted the tunnel is available for receiving a Remote Desktop connection. This is enough to allow testing.
Public key authentication
A few steps are needed to prepare the remote computer for using public key authentication. Both the Copssh and Cygwin installations set up a Terminal menu entry; invoking this opens a window with a command prompt.
- Start by checking for a home directory by typing
pwd('print working directory') at the command prompt. If the result is
/home/user
where 'user' is the current login name, then everything is fine. If not, create a home directory by typingmkdir /home/usersubstituting the console login name in place of 'user'.- Note: usernames without spaces are required.
- Edit
/etc/ssh_configby adding the following lines at the end:
Host server
ExitOnForwardFailure yes
ServerAliveCountMax 3
ServerAliveInterval 15
where 'server' is the name of the intermediate server. This enables the remote computer to detect if the encrypted link fails, and if it does, to shut it down promptly. - Next create the public and private
keys by running
ssh-keygenwithout any options – the default settings are normally appropriate but if there is doubt consult the manual page. Hit the Return key to accept the default values for each question.- The default action is to create the
.sshsub-directory if it doesn't already exist, and then save the key filesid_rsaandid_rsa.pubin it. The latter is the public key which must be copied to the intermediate server. - The private key file-name above has the standard name and is in the standard location.
- The default action is to create the
By default the ssh program will attempt to use a private key
if one is available in the standard location and with a standard name.
If a non-standard name or location is used, then an extra parameter
must be added to the Target box of the shortcut. Examples
of each are:
-i /home/user/.ssh/myKey
-i /.ssh/id_rsa
The manual page for the system configuration file
ssh_config
has more details in the section about the IdentityFile
parameter.
Server computer
The server computer, which forwards incoming tunnelled remote desktop connections, must run an ssh server. Most commonly this will be a verion of OpenSSH, either in its native form on an OpenBSD system, or ported to either Linux or Windows. The following configuration has been tested on a Linux system but should work the same on other operating systems.
Microsoft Windows
If a Microsoft Windows system is being used it can be any version from Windows 2000 onwards. The most recent version of copssh should be installed. This is free to download and free to use. It is available from the ITeF!x website.
During installation a new sub-menu is added to the Start menu, at Programs » Copssh, with options to activate and deactivate users. Only users with existing logins on the server can be activated, so from the Start menu select Settings » Control Panel then open User Accounts to create new accounts, making sure each one is protected by a good password.
Once the user accounts have been created, go to the Copssh program menu and activate the desired users.
If firewall software is running check that an exception has been added to allow ssh connections to be received on port 22. This may have been done automatically when Copssh was installed but it is wise to make sure.
OpenSSH configuration
The default configuration should work if public key authentication is not used however doing so is a major security risk from the intermediate server's point of view. If public key authentication is used then a set of controls may be applied to each login account.
A number of steps are required to set this up and disable logins using passwords. This must be carried out in conjunction with preparing to use public key authentication at the remote and user computers as the public and private key pairs are generated there, and then the public keys are copied to the server.
The steps listed below are applicable to the encrypted links from both the remote computer and the user's computer. A separate login account must be created on the server for each encrypted link that will be received by the server.
- Test that the encrypted link works before making any changes!
- Add the following two lines to the bottom of the system
sshd_config file:
ClientAliveCountMax 3
ClientAliveInterval 15
Restart or reload the sshd process. This enables the intermediate server to detect if any encrypted link fails, and if one does, to shut it down promptly. - Generate the public and private keys on the
remote or
user
computer as appropriate then copy the public key to the server
– this can easily be done using the
scpprogram while the server is allowing logins using a password:
scp pubkey user@server:
where 'pubkey' is the public key file, 'user' is the identity of the login account, and 'server' is the name of the intermediate server. - On the server computer add the following two lines to
the bottom of the system sshd_config file:
Match User login
PasswordAuthentication no
where 'login' is the identity of the login account. Restart or reload the sshd process. - Check that the encrypted link fails to start!
- In the login account home directory create a
.sshdirectory and set the permissions so that only the login account user can access it. Move the public key into the directory and rename it toauthorized_keys. Set the permissions so that only the login account user can access this file, and make sure that the contents is a single line of text.- The following are lists of comma-separated
options, with no space or tab characters, to be inserted at
the start of the line in
authorized_keys, with a single space character separating the option list from the existing contents. - If the login account is being used by a
remote computer, use:
no-pty,
no-agent-forwarding,
no-X11-forwarding,
permitopen=
"127.0.0.1:13",
command=
"/bin/false" - If the login account is being used by a
user computer, use:
no-pty,
no-agent-forwarding,
no-port-forwarding,
no-X11-forwarding,
permitopen=
"127.0.0.1:xxxx",
command=
"/bin/false"
Change 'xxxx' to the port number allocated for connecting to the remote computer, which must be greater than 1024. There must be one 'permitopen' option for every remote computer the user is allowed to access. - The aim is to block misuse of the public key authentication by ensuring that remote commands cannot be executed on the server, blocking remote file copies, and ensuring that it is not possible to set up a forward tunnel to anywhere that might cause problems.
- If the IP address or DNS name of the
connecting computer can be identified then it can be included in
the list as a
from="",option. - See the sshd and sshd_config manual pages for more details.
- The following are lists of comma-separated
options, with no space or tab characters, to be inserted at
the start of the line in
- The final step for securing the server computer is
to set the shell for each login account to
/bin/false– if Copssh is being used then this can be done in the user activation utility but on other systems it will be necessary to edit the/etc/passwdfile.
User's computer
There are three parts to configuring the Remote Desktop connections at the user end. The first is to create an encrypted ssh connection to the intermediate server, and the free to download and free to use PuTTY software, described at Wikipedia, handles this. The second is to configure the Remote Desktop Connection software so that it connects via PuTTY, and the final part is to arrange for tailored PuTTY and Remote Desktop entries to be included in the Start menu.
PuTTY
PuTTY is a terminal emulator that supports a range of connection types including the ssh protocol. It also allows an ssh connection to be used by other programs – in this case it will be used to forward connections received on a local port to the intermediate server. If the standard distribution has been installed, (rather than just the PuTTY program), it will be in the Start menu at Programs » PuTTY » PuTTY.
PuTTY starts by opening a connection window and it is here that all the configuration takes place. The following settings must be changed from the default values:
- In the Session category fill in the Host Name with
serverwhere 'server' is replaced by the internet name of the intermediate server.- If a non-standard port is used by the intermediate server for incoming ssh connections, change the Port setting to match.
- In the Window category, select the Behaviour
sub-category and enter an appropriate Window title. An example
might be:
Encrypted link - In the Connection category select 15 seconds between application keepalives, and enable TCP keepalives.
- In the Connection category, select the Data sub-category and set the Auto-login username to whichever user account is being used to login to the server computer.
- In the Connection category, select the SSH sub-category, enable compression and set the preferred protocol version to "2 only".
- Expand the SSH sub-category and under
Tunnels add a new forwarded port, (a tunnel), for each
computer to be accessed at the remote site. The
Source port should contain something like:
127.0.0.2:4050
The part before the colon is the address and 127.0.0.2 is one of a series of addresses that identify the local computer – this value should be used for all tunnels.- The part after the colon is the port number and this should be unique to each tunnel as it is used to select the computer to be accessed at the remote site, that is, each tunnel starts from the specified port number on this computer.
- The Destination should contain the
loopback address on the intermediate server, followed by a colon
then the port number allocated on the server for the selected
remote computer. An example might be:
127.0.0.1:30211
The specified port is the endpoint of the ssh connection from the remote computer; that ssh connection is available to be used as a tunnel from the intermediate server back to the remote computer. - Once the Source port and Destination boxes have been filled in, select the Add button.
- Finally return to the Session category and save the modified configuration by entering a suitable name in the Saved Sessions box and selecting the Save button.
Public key authentication
PuTTYgen is a key pair generator that is part of the PuTTY suite of programs. If the standard PuTTY distribution has been installed it will be in the Start menu at Programs » PuTTY » PuTTYgen.
- In the parameters section at the bottom of the window select SSH-2 RSA and 2048 bits.
- Select the Generate button and follow the instructions at the top of the window to make enough random data to create the key pair.
- Optionally enter a passphrase – this increases security at the expense of convenience.
- Select the Save private key button. Store the file in,
for example,
C:\My Documents\ssh keys\id_rsa.ppk - Start PuTTY, select the saved session for connecting to the intermediate server then select the Load button followed by the Open button.
- Enter the appropriate password to login to the intermediate server.
- In the PuTTY window type:
cat > id_rsa.pub
then press the Return key to prepare for copying the public key. - In the PuTTYgen window select the entire contents of the
public key, in the box at the top of the window, and type
Ctrl-Cto send a copy to the clipboard. - Select the PuTTY window then use the right mouse button to
paste the contents of the clipboard, press the
Return key then type
Ctrl-Dto close the file.
The remaining steps to use public key authentication are carried out on the intermediate server.
Remote Desktop client
Before configuring a Remote Desktop Connection it is convenient to
edit the hosts file so that the title bar of the Remote
Desktop Connection can have a meaningful name. It might be necessary
to search for the file but on Windows XP Professional it is located
under C:\WINDOWS\system32 in the
drivers\etc directory. Despite not having a file
extension it can be edited using Notepad. Add a new line, in the
format described in the file, starting with 127.0.0.2 then followed
by a spaces or tab characters then the chosen name. Examples are:
127.0.0.2 AccountsPC
127.0.0.2 acc.company.ssh
127.0.0.2 payroll.secure
but remember there should be no characters or spaces before the
number on the line. A further restriction is that the name must be
one word, that is it must not contain any spaces or tab characters,
nor any punctuation other than a hyphen or a period. Add one entry
in this format for every computer that is to be accessed at the
remote site, keeping the numbers the same for each entry.
As mentioned in the introductory notes the Remote Desktop Connection software is invoked from the Start menu at Programs » Accessories » Remote Desktop Connection. In similar fashion to PuTTY, Remote Desktop Connection opens a window where all the configuration takes place. To access the configuration options, select the Options button. There are only a small number of changes needed:
- On the General tab, Logon settings area, in
the Computer box enter the name added to the
hosts file followed by a colon then the port number
entered in the Source port of the
PuTTY configuration for the selected
remote computer. Using an entry from the example hosts file,
above, this could be:
AccountsPC:4050
Remember, the port number determines which computer at the remote site will be accessed rather than the name. - On the Display tab, in the Remote desktop size area, adjust the size to be no larger than the pixel resolution of the display on the local computer. The same size is a good choice since when the remote desktop window is maximised it takes up all of the local display.
- On the Local Resources tab it might be better to set the Remote computer sound to Leave at remote computer as this improves performance.
- In the Experience tab deselect the Themes tick-box, also for improved performance.
- Return to the General tab and select the Save As button, giving the saved configuration file a meaningful name.
The configuration is saved in an .rdp file under My
Documents, and will be used in the next section.
Start menu
An entry can be added to the Start menu to start PuTTY with
the saved session. First copy the PuTTY shortcut to a convenient
location in the menu hierarchy then open the context menu to edit
the Properties. In the General tab change the name
to reflect the purpose of the menu entry – Encrypted link
to Intermediate Server might be suitable – then go to the
Shortcut tab and append the following in the Target
box:
-load SessionName
If the actual session name includes spaces then it will need to be
enclosed in quotes. A couple of examples show the difference:
-load ServerSite
-load "Server Site"
Select the OK button to complete this step. The ssh
connection can be tested by selecting the newly created menu entry;
a command window box should appear on the screen with a prompt for
the user to enter the correct password. When a password has been
accepted the connection is fully established. The connection is
closed by closing the window.
An entry can also be added to the Start menu to start a
Remote Desktop connection by making a short-cut link to the
appropriate .rdp file saved at the end of the process
described in the Remote Desktop client
section, and moving it to the same location in the menu hierarchy
as the Encrypted Link to Intermediate Server shortcut.
It should be renamed so that it is meaningful; an example might be
Remote Site Accounts PC.
User guide
The first steps are to start ssh connections to the intermediate server from the user's computer and from one or more remote computers.
This is accomplished on the user's computer by, using the example above, selecting Encrypted link to Intermediate Server from the Start menu. When the server is connected a password prompt is displayed. After the password has been accepted the first part of the link is available to tunnel Remote Desktop connections.
Depending on the scheme chosen, the encrypted link from the remote computer may already have been established. If not it will be necessary to ask someone at the remote site to login to the remote computer and start the encrypted link.
If encrypted links from remote computers are automatic then it may be helpful to contact someone at the remote site before initiating a Remote Desktop connection to a specific computer in case it is already being used.
Remote Desktop connections can be established by selecting the appropriate link from the Start menu. More than one Remote Desktop connection may be in use at the same time.
It may also be helpful to make sure that staff at the remote site know when a computer is free for others to use.
Once all the Remote Desktop connections have been closed it is safe to close the PuTTY window, severing the encrypted connection with the intermediate server.